Interpolated Vertex Coordinates
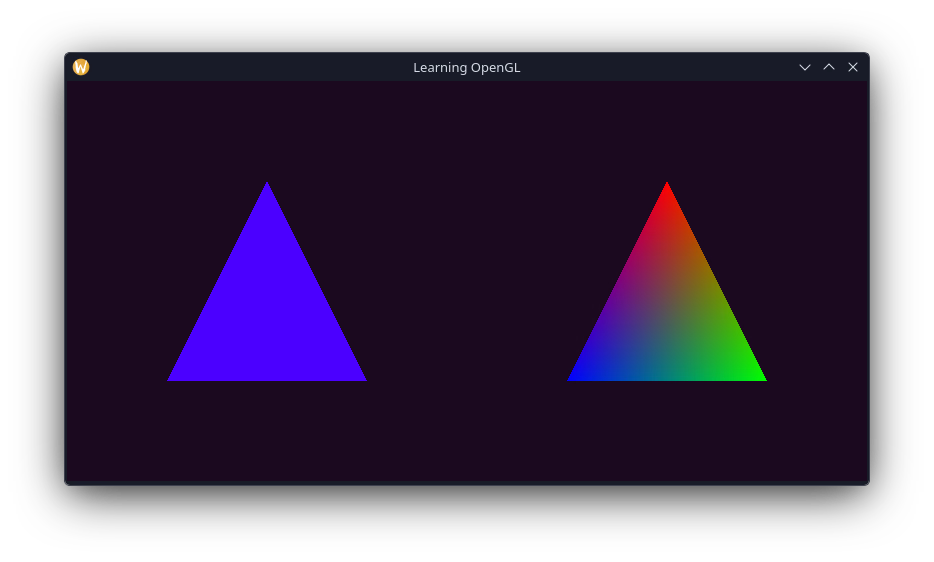
In my last post, I mentioned how attributes can be passed from the vertex shader to the fragment shader, and that these values get interpolated by OpenGL. We reached the milestone in computer graphics called the "Hello World Triangle".
Next up I'm going to try to write the "TexCoord Test Square". I'll get into what TexCoords are later in this post, but what this involves is taking a square and passing the vertex coordinates from the vertex shader to the fragment shader. So, first up is to re-implement our element buffer code with our new shader stuff.
uint32 vertexArrayObject1;
uint32 vertexBufferObject1;
uint32 elementBufferObject;
glGenVertexArrays(1, &vertexArrayObject1);
glGenBuffers(1, &vertexBufferObject1);
glGenBuffers(1, &elementBufferObject);

glBindVertexArray(vertexArrayObject1);

glBindBuffer(GL_ARRAY_BUFFER, vertexBufferObject1);
glBufferData(GL_ARRAY_BUFFER, sizeof(vertices), vertices, GL_STATIC_DRAW);
glBindBuffer(GL_ELEMENT_ARRAY_BUFFER, elementBufferObject);
glBufferData(GL_ELEMENT_ARRAY_BUFFER, sizeof(indices), indices, GL_STATIC_DRAW);

glVertexAttribPointer(0, 3, GL_FLOAT, GL_FALSE, 3 * sizeof(float32), nullptr);
glEnableVertexAttribArray(0);
Now for the shader code, I've added an offset of 0.5 to the x and y components so that the range of colours on the square is between 0 and 1.
#version 330 core
out vec4 FragColor;
in vec3 fragPos;
void main() {
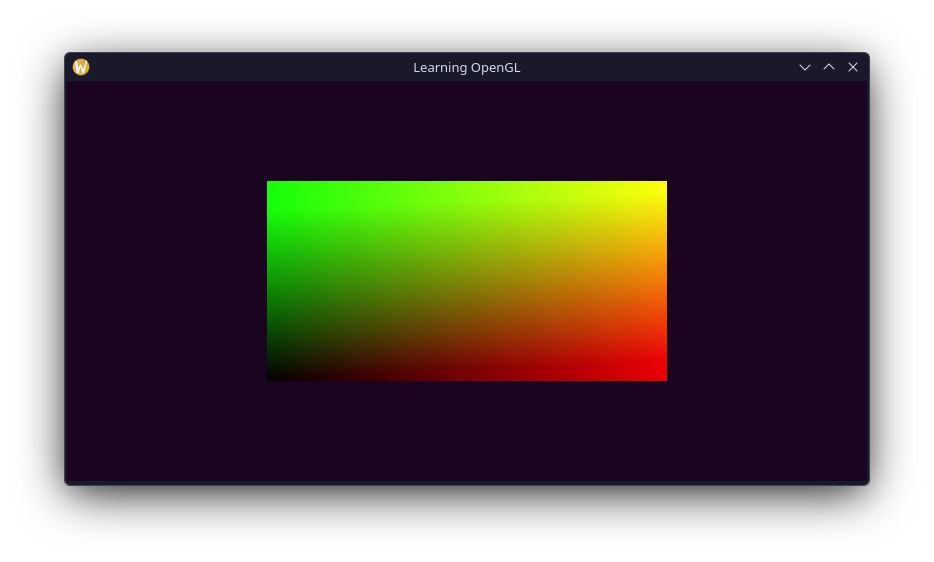
FragColor = vec4(fragPos.xy + .5, fragPos.z, 1.0);
}Adding in our old points for the square, and the indiced into the element buffer, we now have a square that looks like this.
Texture Coordinates
This hacky representation of the vertex positions being shown demonstrates the principle of how texture coordinates work. We can specify some system of coordinates in the vertex shader that when read in a fragment shader, get linearly interpolated. We in essence, get a coordinate for our fragment through them. What we can then do is use these coordinates to sample from an image to project it onto its respective fragment.
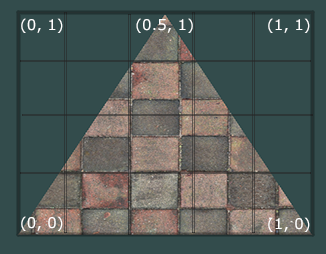
To map a texture onto the square we first need to map each vertext to a point on the texture it corresponds to. Texture coordinates are in the range [0, 1], so with a square this is quite easy; Each corner vertex has texture coordinates (1,1), (1, 0), (0, 0), and (0, 1) respectively.
Creating a Texture
Let's start mapping a texture on to the square/rectangle. Firstly we need to load an image to use as our texture. Since writing my own code to parse images would take forever, I'm going to use a 3rd part library. stb_image was recommended by a lot of places, and is what is used on the Learn OpenGL website.
int32 width, height, nChannels;
uint8 *data = stbi_load("placeholder.jpg", &width, &height, &nChannels, 0);
Next we need to create a texture object. Like every other OpenGL object seen thus-far, we need to get an ID for it, bind it and load our data.
uint32 texture;
glGenTextures(1, &texture);
glBindTexture(,);
glTexImage2D(, 0,,,, 0,,,);Thats quite a big function call right? Some of the arguments should be obvious as to their purpose, others less so. Before I talk about that, there's something else I'm going to cover first.
Mipmaps
Lets suppose we're working with a big scene with loads of objects and hundreds of textures. Some objects may be really far away, in that case memory is wasted holding a massive texture for what ends up being only a few pixels on the screen. The main consequence it puts a strain on OpenGL to sample the correct colour for the pixel as it ends up having to compute with hundreds of values. This can also cause visual artifacts that we want to avoid.
So to solve this issue, we generate mipmaps for our texture. A mipmap is a collection of coppies of our texture where each one is half the size of the one before it. The idea is that for different distances, sizes... etc. OpenGL will use the appopriate mipmap to sample the pixel colour. It also involves less memory when sampling that part of the mipmap. Learn OpenGL shows a great example representation of a mipmap, which is included below.
This can be a pain to do manually, fortunately however OpenGL can do all the work for us with a single function call.
Texture Filtering
Even with a prepped texture for sampling, we wont have a mipmap that perfectly pixel-aligns for the end result. So how does OpenGL decide the final pixel? There are 2 main methods, the first is Bilinear Filtering, this linearly interpolates the pixel colour using the neighbouring texels. The second is Nearest Neighbour Filtering, which simply takes the closest texel to the coordinates given. This results in a more pixelly look to the rendered texture. Minecraft textures, for example, use Nearest Neighbour filtering. Bilinear filtering on pixelly/low-resolution textures would result in a blurry mess.
We can specify the filtering method for sampling our mipmap as well, with regards to how close the appropriate size is.
Anyway, back to the code.
uint32 texture;
glGenTextures(1, &texture);
glBindTexture(,);
glTexImage2D(, 0,,,, 0,,,);- The first argument specifies that we're loading the the currently bound
GL_TEXTURE_2Dobject. - The second specifies the mipmap level we want to create a texture for. You can manually create mipmap textures for each level, but here I'm leaving it as the base level, 0.
- Third is how we will be storing the texture data, in this case RGB values.
- Fourth and fifth is our texture's resolution
- Sixth... not sure, the docs just say this value must be 0 ¯\(ツ)/¯ - some legacy stuff apparently.
- Seventh and Eighth specify the format of the source image
- And the ninth is our texture data.
Now we can generate the mipmaps for our texture.
uint32 texture;
glGenTextures(1, &texture);
glBindTexture(,);
glTexImage2D(, 0,,,,0,,,);
glGenerateMipmap();Now that we're finished with the image data, we can free the original data as to not leak any memory.
stbi_image_free();And finally before I forget, set the texture wrapping and filtering methods.
glTexParameteri(,,);
glTexParameteri(,,);
glTexParameteri(,,);
glTexParameteri(,,);Applying a Texture
Next up we need to add our texture coordinates to our vertex data. We only need 2 float values for this, since the texture is 2D.
float32 vertices[] = {
//    X      Y     Z         S     T
     0.5f,  0.5f, 0.0f,     1.0f, 1.0f,
     0.5f, -0.5f, 0.0f,     1.0f, 0.0f,
    -0.5f, -0.5f, 0.0f,     0.0f, 0.0f,
    -0.5f,  0.5f, 0.0f,     0.0f, 1.0f,
};
And now we need to set the vertex attributes so we can access our texcoords.
// Vertex Attributes
// Vertices
glVertexAttribPointer(0, 3,,, 5 * sizeof(), (void *)(0 * sizeof()));
glEnableVertexAttribArray(0);
// Texcoords
glVertexAttribPointer(1, 2,,, 5 * sizeof(), (void *)(3 * sizeof()));
glEnableVertexAttribArray(1);Next we create a fragment shader to parse our texcoords to the fragment shader and to interpolate them.
#version 330 core
layout(=0) in vec3 aPos;
layout(=1) in vec2 aTexCoord;
out vec2 fragTexCoord;
void main() {
gl_Position = vec4(aPos.xyz, 1.0);
fragTexCoord = aTexCoord;
}Now we need to sample our texture from the vertex shader. So, how do we do this? GLSL supports a sampler data-type. By declaring a uniform of the associated sampler type, sampler2D for a 2D texture, we can assign our texture to it, and use it to sample our texture using the coordinates we need. We then use a built-in texture function, with the sampler and texcoords to get the final fragment colour.
#version 330 core
out vec4 FragColor;

in vec2 fragTexCoord;

uniform sampler2D uTexture;

void main()
{
    FragColor = texture(uTexture, TexCoord);
}
Now we just need to set the texture to use in our render loop, and see the results!
glBindTexture(GL_TEXTURE_2D, texture);
glBindVertexArray(vertexArrayObject1);
glDrawElements(GL_TRIANGLES, 6, GL_UNSIGNED_INT, nullptr);
We can also mix the resulting texture with vertex colours through simple multiplication.
FragColor = texture(,) * vec4(fragColour.rgb, 1.0);Of course, I did need to add more vertex attributes to reintroduce the colours. However this was trivial and I was able to do it without assistance from the website. Which I feel means I'm properly learning how all this works, so that's nice!
Anyway, since we have new vertex attributes, we need to enable them and reallign the other attribute stuff.
// Vertex Attributes
// Vertices
glVertexAttribPointer(0, 3,,, 8 * sizeof(), (void*)(0*sizeof()));
glEnableVertexAttribArray(0);
// Texcoords
glVertexAttribPointer(1, 2,,, 8 * sizeof(), (void*)(3*sizeof()));
glEnableVertexAttribArray(1);
// Colours
glVertexAttribPointer(2, 3,,, 8 * sizeof(), (void*)(5*sizeof()));
glEnableVertexAttribArray(2);Anyway, the result of doing this (and also adding colour values to our vertex array) is this: 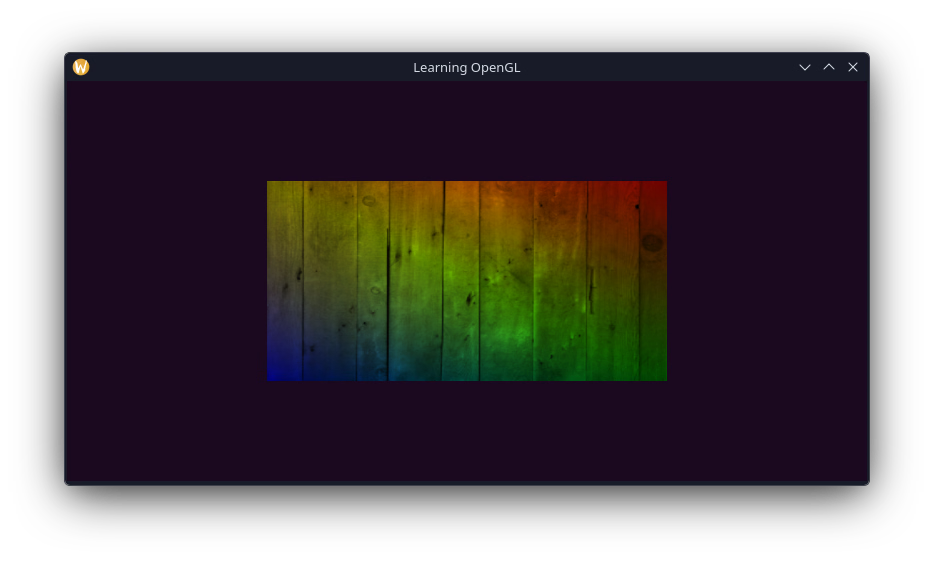
Texture Units
One thing to note is that we never actually accessed the uniform the sampler is in for setting the texture. OpenGL stores textures in "texture units" which are like a special bit of storage specifically for textures, in my understanding. The default location for a texture is 0, so the driver implementation handles storing the texture in the right location for me.
Lets try using two textures. We can specify texture units to store images in manually, allowing us to use multiple textures. We can set the texture unit to use via the glActiveTexture function, before we bind the texture.
glGenTextures(1, &texture);
glActiveTexture();
glBindTexture(,);We can see that this properly configures the texture unit used, if we set the active texture to GL_TEXTURE1 then our rectangle becomes black. 
Loading a second texture requires some changes to our render loop. We need to set the active texture unit, before binding each texture every frame.
glActiveTexture();
glBindTexture(,);
glActiveTexture();
glBindTexture(,);Next we need to set the texture unit each sample references. From OpenGL 4.2 this can be donw from within the shader, however since I'm using an older version (which im starting to regret) we need to set this manually from our C code. Since we only need to do this once, this can be done before entering the render loop.
glUseProgram();
shaderSetInt(&defaultShader, "uTexture1", 0);
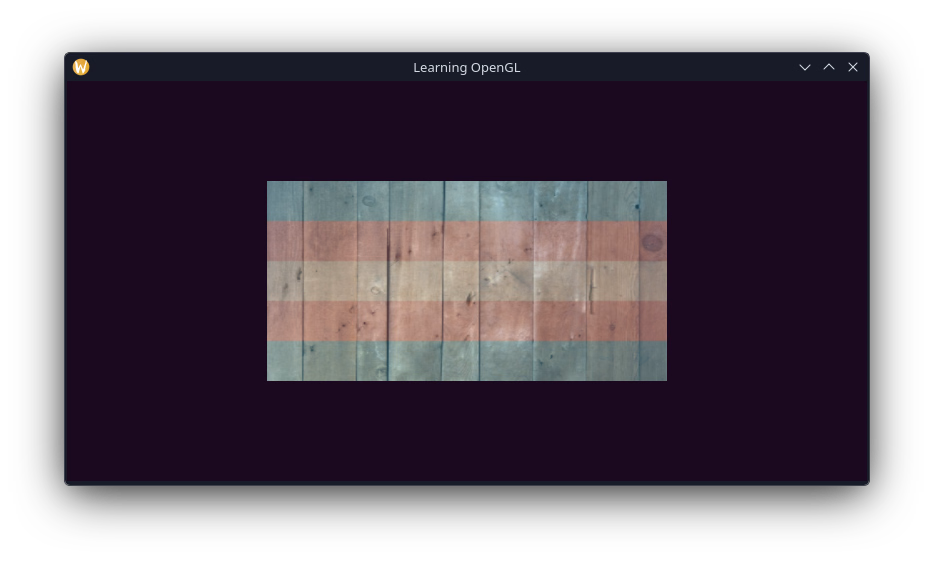
shaderSetInt(&defaultShader, "uTexture2", 1);GLSL has a builtin mix function which we can use to combine textures.
FragColor = mix(texture(,), texture(,), 0.3);Anyway, here is the result of the work done for this post.